
拓扑图
配置过程
PC分配IP
PC1:192.168.1.1/24
PC2:192.168.1.2/24
PC>ipconfig

Link local IPv6 address...........: fe80::5689:98ff:fe87:1e5f
IPv6 address......................: :: / 128
IPv6 gateway......................: ::
IPv4 address......................: 192.168.1.1
Subnet mask.......................: 255.255.255.0
Gateway...........................: 192.168.1.254
Physical address..................: 54-89-98-87-1E-5F
DNS server........................:

PC>ipconfig

Link local IPv6 address...........: fe80::5689:98ff:fe69:79e9
IPv6 address......................: :: / 128
IPv6 gateway......................: ::
IPv4 address......................: 192.168.1.2
Subnet mask.......................: 255.255.255.0
Gateway...........................: 192.168.1.254
Physical address..................: 54-89-98-69-79-E9
DNS server........................:
防火墙分配IP
防火墙需要登陆,默认账号:admin,密码:Admin@123
g1/0/2:192.168.1.254/24,允许ping
g1/0/0:192.168.2.254/24
g1/0/1:100.1.1.1/24
Username:admin
Password:
The password needs to be changed. Change now? [Y/N]: y
Please enter old password:
Please enter new password:
Please confirm new password:
Info: Your password has been changed. Save the change to survive a reboot.
*************************************************************************
* Copyright (C) 2014-2018 Huawei Technologies Co., Ltd. *
* All rights reserved. *
* Without the owner's prior written consent, *
* no decompiling or reverse-engineering shall be allowed. *
*************************************************************************
<USG6000V1>
<USG6000V1>system-view
Enter system view, return user view with Ctrl+Z.
[USG6000V1]undo info-center enable
Info: Saving log files...
Info: Information center is disabled.
[USG6000V1]interface gigabitether 1/0/2
[USG6000V1-GigabitEthernet1/0/2]ip address 192.168.1.254 24
[USG6000V1-GigabitEthernet1/0/2]service-manage ping permit
[USG6000V1-GigabitEthernet1/0/2]quit
[USG6000V1]interface gigabitether 1/0/0
[USG6000V1-GigabitEthernet1/0/0]ip address 192.168.2.254 24
[USG6000V1-GigabitEthernet1/0/0]quit
[USG6000V1]interface gigabitether 1/0/1
[USG6000V1-GigabitEthernet1/0/1]ip address 100.1.1.1 24
[USG6000V1-GigabitEthernet1/0/1]quit
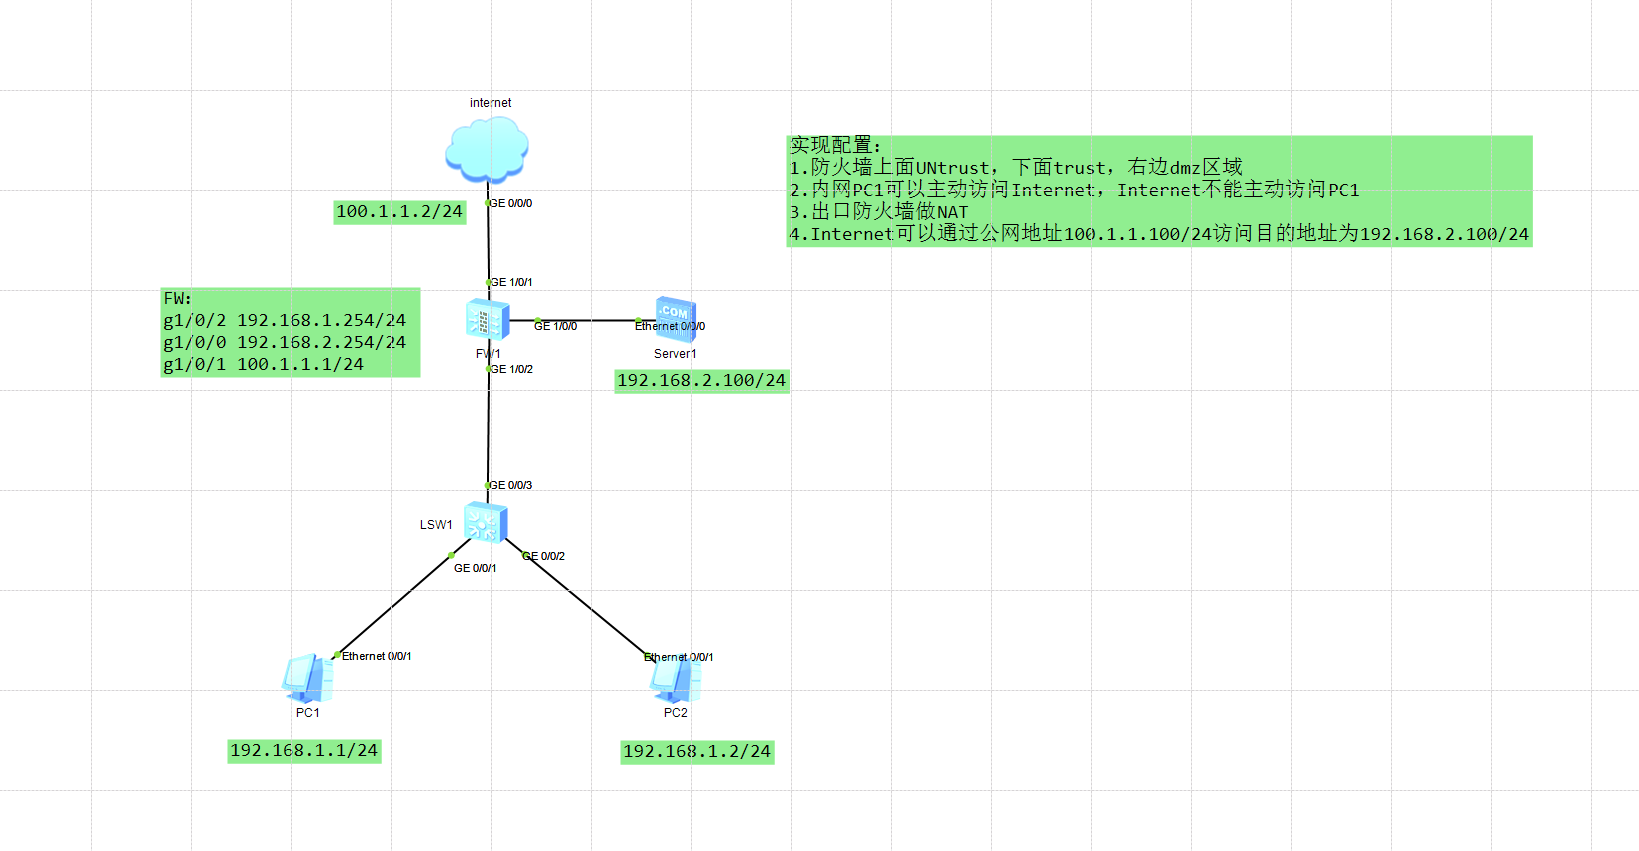
[USG6000V1]服务器配置IP
ip:192.168.2.100
网关:192.168.2.254
Internet分配IP
g0/0/0:100.1.1.2 /24
<Huawei>system-view
Enter system view, return user view with Ctrl+Z.
[Huawei]undo info-center enable
Info: Information center is disabled.
[Huawei]interface gigabitether 0/0/0
[Huawei-GigabitEthernet0/0/0]ip address 100.1.1.2 24
[Huawei-GigabitEthernet0/0/0]quit
[Huawei]sysname internet
[internet]
防火墙安全域划分
把相应的接口划入相应的区域
trust:g1/0/2
untrust:g1/0/1
dmz:g1/0/0
[USG6000V1]firewall zone trust
[USG6000V1-zone-trust]add interface gigabitether 1/0/2
[USG6000V1-zone-trust]quit
[USG6000V1]firewall zone untrust
[USG6000V1-zone-untrust]add interface gigabitether 1/0/1
[USG6000V1-zone-untrust]quit
[USG6000V1]firewall zone dmz
[USG6000V1-zone-dmz]add interface gigabitether 1/0/0
[USG6000V1-zone-dmz]quit
[USG6000V1]
创建安全策略
安全策略名:trust_to_untrust
源区域:trust
目的区域:untrust
源地址(可设可不设)1.0网段:192.168.1.0 24
目的地址(可设可不设)所有:any
动作:允许
[USG6000V1]security-policy
[USG6000V1-policy-security]rule name trust_to_untrust
[USG6000V1-policy-security-rule-trust_to_untrust]source-zone trust
[USG6000V1-policy-security-rule-trust_to_untrust]destination-zone untrust
[USG6000V1-policy-security-rule-trust_to_untrust]source-address 192.168.1.0 24
[USG6000V1-policy-security-rule-trust_to_untrust]destination-address any
[USG6000V1-policy-security-rule-trust_to_untrust]action permit
[USG6000V1-policy-security-rule-trust_to_untrust]quit
[USG6000V1-policy-security]quit
[USG6000V1]
配置NAT
策略建好了但是访问不到互联网,没有做nat
地址池名称:addressgroup1
模式:pat
公网地址:100.1.1.10-100.1.1.20
[USG6000V1]nat address-group addressgroup1
[USG6000V1-address-group-addressgroup1]mode pat
[USG6000V1-address-group-addressgroup1]section 0 100.1.1.10 100.1.1.20
[USG6000V1-address-group-addressgroup1]quit
[USG6000V1]
NAT策略
策略名称:nat1
源区域:trust
目的区域:untrust
源地址:192.168.1.0 /24
目的地址:any
动作:基于源地址nat,使用addressgroup1地址池
[USG6000V1]nat-policy
[USG6000V1-policy-nat]rule name nat1
[USG6000V1-policy-nat-rule-nat1]source-zone trust
[USG6000V1-policy-nat-rule-nat1]destination-zone untrust
[USG6000V1-policy-nat-rule-nat1]source-address 192.168.1.0 24
[USG6000V1-policy-nat-rule-nat1]destination-address any
[USG6000V1-policy-nat-rule-nat1]action source-nat address-group addressgroup1
[USG6000V1-policy-nat-rule-nat1]quit
[USG6000V1-policy-nat]quit
[USG6000V1]
这时候用PC去ping互联网,已经通了
PC>ping 100.1.1.2

Ping 100.1.1.2: 32 data bytes, Press Ctrl_C to break
From 100.1.1.2: bytes=32 seq=1 ttl=254 time=47 ms
From 100.1.1.2: bytes=32 seq=2 ttl=254 time=47 ms
From 100.1.1.2: bytes=32 seq=3 ttl=254 time=31 ms
From 100.1.1.2: bytes=32 seq=4 ttl=254 time=47 ms
From 100.1.1.2: bytes=32 seq=5 ttl=254 time=47 ms

--- 100.1.1.2 ping statistics ---
  5 packet(s) transmitted
  5 packet(s) received
  0.00% packet loss
  round-trip min/avg/max = 31/43/47 ms

PC>
可以查看一下session表,ping停止后过段时间会消失,先ping一下再查看session表
[USG6000V1]display firewall session table
2023-10-06 02:35:27.900
 Current Total Sessions : 5
 icmp  VPN: public --> public  192.168.1.1:20082[100.1.1.20:2066] --> 100.1.1.2:
2048
 icmp  VPN: public --> public  192.168.1.1:20338[100.1.1.20:2067] --> 100.1.1.2:
2048
 icmp  VPN: public --> public  192.168.1.1:19570[100.1.1.20:2064] --> 100.1.1.2:
2048
 icmp  VPN: public --> public  192.168.1.1:19314[100.1.1.20:2063] --> 100.1.1.2:
2048
 icmp  VPN: public --> public  192.168.1.1:19826[100.1.1.20:2065] --> 100.1.1.2:
2048
[USG6000V1]
到这里拓扑图里面的4点要求都已经实现
访问服务器配置
拓扑图里面还有个dmz区域没做任何配置,此时内部PC是访问不了服务器的
实现PC访问服务器,和trust访问untrust一样,放行trust到dmz区域的流量即可,配置如下
安全策略
创建个trust到dmz的策略
[USG6000V1]security-policy
[USG6000V1-policy-security]rule name trust_to_dmz
[USG6000V1-policy-security-rule-trust_to_dmz]source-zone trust
[USG6000V1-policy-security-rule-trust_to_dmz]destination-zone dmz
[USG6000V1-policy-security-rule-trust_to_dmz]action permit
[USG6000V1-policy-security-rule-trust_to_dmz]quit
[USG6000V1-policy-security]quit
[USG6000V1]
这个时候去ping 服务器可以通了
PC>ping 192.168.2.100

Ping 192.168.2.100: 32 data bytes, Press Ctrl_C to break
Request timeout!
From 192.168.2.100: bytes=32 seq=2 ttl=254 time=31 ms
From 192.168.2.100: bytes=32 seq=3 ttl=254 time=47 ms
From 192.168.2.100: bytes=32 seq=4 ttl=254 time=15 ms
From 192.168.2.100: bytes=32 seq=5 ttl=254 time=31 ms

--- 192.168.2.100 ping statistics ---
  5 packet(s) transmitted
  4 packet(s) received
  20.00% packet loss
  round-trip min/avg/max = 0/31/47 ms

PC>
NAT Server配置
再来实现一下nat server 端口映射,把内网web服务器映射到公网地址,允许公网访问服务器
nat server 映射,www换成80 也是一样的
[USG6000V1]nat server protocol tcp global 100.1.1.100 80 inside 192.168.2.100 www映射后公网还是访问不了服务器,没有放行untrust到dmz的流量,所以再建条安全策略
[USG6000V1]security-policy
[USG6000V1-policy-security]rule name untrust_to_dmz
[USG6000V1-policy-security-rule-untrust_to_dmz]source-zone untrust
[USG6000V1-policy-security-rule-untrust_to_dmz]destination-zone dmz
[USG6000V1-policy-security-rule-untrust_to_dmz]action permit
[USG6000V1-policy-security-rule-untrust_to_dmz]quit
[USG6000V1-policy-security]quit
[USG6000V1]
放行后去Internet上使用Telnet模拟访问服务器
<Huawei>telnet 100.1.1.100 80
  Press CTRL_] to quit telnet mode
  Trying 100.1.1.100 ...
  Connected to 100.1.1.100 ...
通过服务器的日志信息可以看到访问成功了
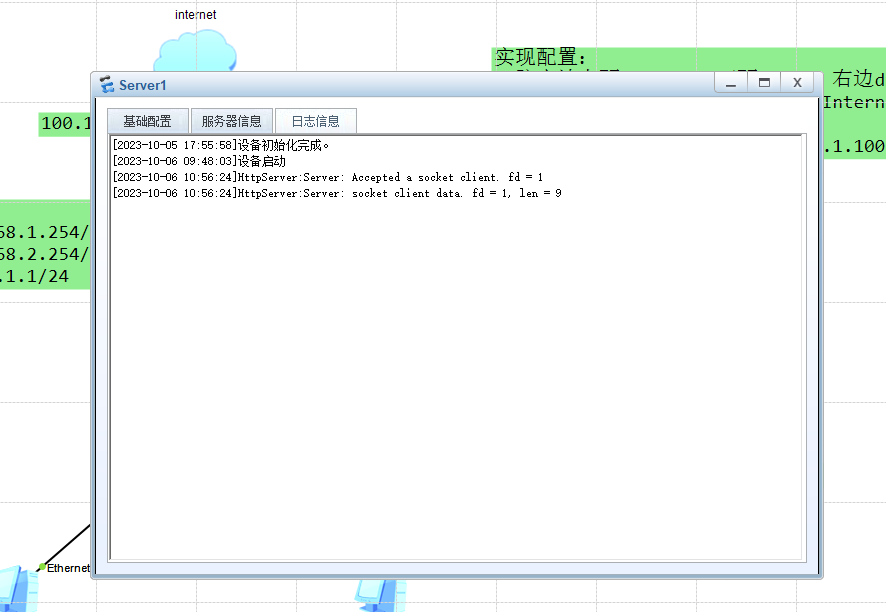 也可以到防火墙上查看session表,可以看到公网地址100.1.1.2访问服务器映射的公网地址100.1.1.100,实际内网地址192.168.2.100的80端口
[USG6000V1]display firewall session table
2023-10-06 02:59:04.750
 Current Total Sessions : 1
 http  VPN: public --> public  100.1.1.2:49852 --> 100.1.1.100:80[192.168.2.100:
80]
[USG6000V1]


评论区