Kubernetes官网:https://kubernetes.io/
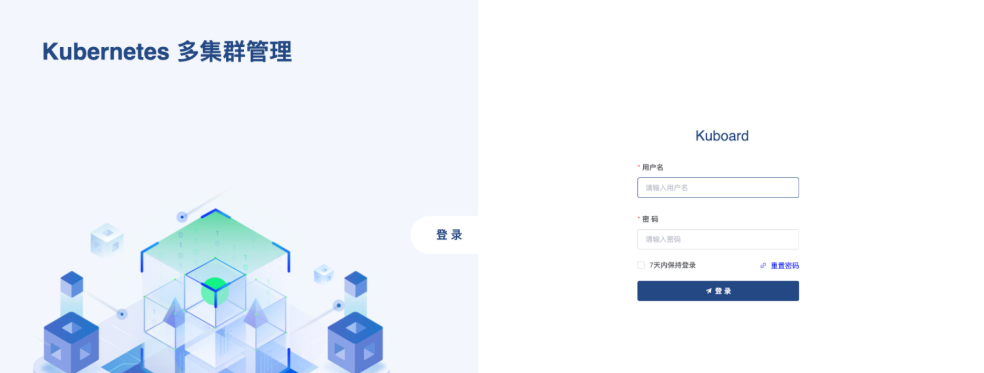
Kuboard官网:https://kuboard.cn/
这里部署kubernetes_v1.19.x版本
准备了两台服务器:192.168.170.89(k8s-master)、192.168.170.90(k8s-slave)
下面以master和slave替代描述这两台服务器
配置要求
对于 Kubernetes 初学者,在搭建K8S集群 时,推荐在阿里云或腾讯云采购如下配置:(您也可以使用自己的虚拟机、私有云等您最容易获得的 Linux 环境)
至少2台 2核4G 的服务器
Cent OS 7.6 / 7.7 / 7.8
检查 centos / hostname
# 在 master 节点和 worker 节点都要执行
cat /etc/redhat-release

# 此处 hostname 的输出将会是该机器在 Kubernetes 集群中的节点名字
# 不能使用 localhost 作为节点的名字
hostname

# 请使用 lscpu 命令,核对 CPU 信息
# Architecture: x86_64    本安装文档不支持 arm 架构
# CPU(s):       2         CPU 内核数量不能低于 2
lscpu
检查我们的master配置
[root@k8s-master ~]# cat /etc/redhat-release
CentOS Linux release 7.9.2009 (Core)
[root@k8s-master ~]# hostname
k8s-master
[root@k8s-master ~]# lscpu
Architecture:          x86_64
CPU op-mode(s):        32-bit, 64-bit
Byte Order:            Little Endian
CPU(s):                2
On-line CPU(s) list:   0,1
Thread(s) per core:    1
Core(s) per socket:    1
Socket(s):             2
NUMA node(s):          1
Vendor ID:             GenuineIntel
CPU family:            6
Model:                 85
Model name:            Intel(R) Xeon(R) Silver 4214R CPU @ 2.40GHz
Stepping:              7
CPU MHz:               2394.375
BogoMIPS:              4788.75
Hypervisor vendor:     VMware
Virtualization type:   full
L1d cache:             32K
L1i cache:             32K
L2 cache:              1024K
L3 cache:              16896K
NUMA node0 CPU(s):     0,1
Flags:                 fpu vme de pse tsc msr pae mce cx8 apic sep mtrr pge mca cmov pat pse36 clflush mmx fxsr sse sse2 ss syscall nx pdpe1gb rdtscp lm constant_tsc arch_perfmon nopl xtopology tsc_reliable nonstop_tsc eagerfpu pni pclmulqdq ssse3 fma cx16 pcid sse4_1 sse4_2 x2apic movbe popcnt tsc_deadline_timer aes xsave avx f16c rdrand hypervisor lahf_lm abm 3dnowprefetch invpcid_single ssbd ibrs ibpb stibp fsgsbase tsc_adjust bmi1 hle avx2 smep bmi2 invpcid rtm mpx avx512f avx512dq rdseed adx smap clflushopt clwb avx512cd avx512bw avx512vl xsaveopt xsavec arat pku ospke spec_ctrl intel_stibp flush_l1d arch_capabilities
[root@k8s-master ~]#
检查我们的slave配置
[root@k8s-slave ~]# cat /etc/redhat-release
CentOS Linux release 7.9.2009 (Core)
[root@k8s-slave ~]#
[root@k8s-slave ~]# hostname
k8s-slave
[root@k8s-slave ~]# lscpu
Architecture:          x86_64
CPU op-mode(s):        32-bit, 64-bit
Byte Order:            Little Endian
CPU(s):                2
On-line CPU(s) list:   0,1
Thread(s) per core:    1
Core(s) per socket:    1
Socket(s):             2
NUMA node(s):          1
Vendor ID:             GenuineIntel
CPU family:            6
Model:                 85
Model name:            Intel(R) Xeon(R) Silver 4214R CPU @ 2.40GHz
Stepping:              7
CPU MHz:               2394.375
BogoMIPS:              4788.75
Hypervisor vendor:     VMware
Virtualization type:   full
L1d cache:             32K
L1i cache:             32K
L2 cache:              1024K
L3 cache:              16896K
NUMA node0 CPU(s):     0,1
Flags:                 fpu vme de pse tsc msr pae mce cx8 apic sep mtrr pge mca cmov pat pse36 clflush mmx fxsr sse sse2 ss syscall nx pdpe1gb rdtscp lm constant_tsc arch_perfmon nopl xtopology tsc_reliable nonstop_tsc eagerfpu pni pclmulqdq ssse3 fma cx16 pcid sse4_1 sse4_2 x2apic movbe popcnt tsc_deadline_timer aes xsave avx f16c rdrand hypervisor lahf_lm abm 3dnowprefetch invpcid_single ssbd ibrs ibpb stibp fsgsbase tsc_adjust bmi1 hle avx2 smep bmi2 invpcid rtm mpx avx512f avx512dq rdseed adx smap clflushopt clwb avx512cd avx512bw avx512vl xsaveopt xsavec arat pku ospke spec_ctrl intel_stibp flush_l1d arch_capabilities
[root@k8s-slave ~]#
修改 hostname
如果您需要修改 hostname,可执行如下指令:
# 修改 hostname
hostnamectl set-hostname your-new-host-name
# 查看修改结果
hostnamectl status
# 设置 hostname 解析
echo "127.0.0.1   $(hostname)" >> /etc/hosts
检查网络
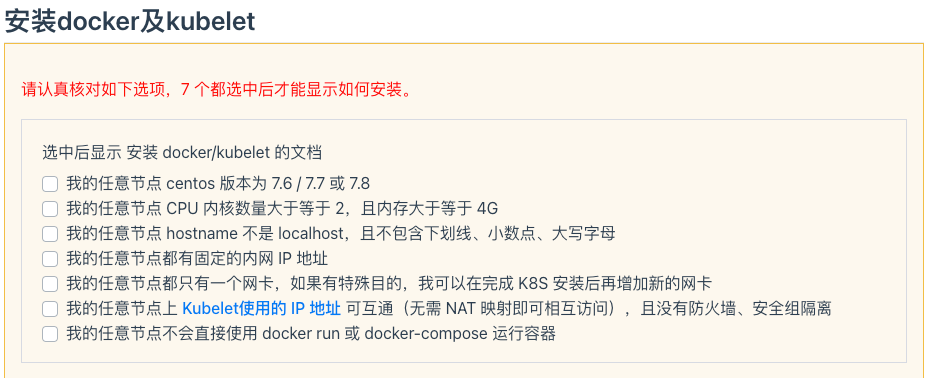
kubelet使用的IP 地址
ip route show 命令中,可以知道机器的默认网卡,通常是 eth0,如 default via 172.21.0.23 dev eth0
ip address 命令中,可显示默认网卡的 IP 地址,Kubernetes 将使用此 IP 地址与集群内的其他节点通信,如 172.17.216.80
所有节点上 Kubernetes 所使用的 IP 地址必须可以互通(无需 NAT 映射、无安全组或防火墙 隔离)
新启动的主机默认都是开启防火墙的,我们关闭一下firewalld,master
[root@k8s-master ~]# systemctl stop firewalld
[root@k8s-master ~]# systemctl disable firewalld
Removed symlink /etc/systemd/system/multi-user.target.wants/firewalld.service.
Removed symlink /etc/systemd/system/dbus-org.fedoraproject.FirewallD1.service.
[root@k8s-master ~]#
slave关闭
[root@k8s-slave ~]# systemctl stop firewalld
[root@k8s-slave ~]# systemctl disable firewalld
Removed symlink /etc/systemd/system/multi-user.target.wants/firewalld.service.
Removed symlink /etc/systemd/system/dbus-org.fedoraproject.FirewallD1.service.
[root@k8s-slave ~]#
安装docker及kubelet
满足以下几点就可以安装了
快速安装脚本,在master和slave机器上都安装
# 在 master 节点和 worker 节点都要执行
# 最后一个参数 1.19.5 用于指定 kubenetes 版本,支持所有 1.19.x 版本的安装
# 腾讯云 docker hub 镜像
# export REGISTRY_MIRROR="https://mirror.ccs.tencentyun.com"
# DaoCloud 镜像
# export REGISTRY_MIRROR="http://f1361db2.m.daocloud.io"
# 华为云镜像
# export REGISTRY_MIRROR="https://05f073ad3c0010ea0f4bc00b7105ec20.mirror.swr.myhuaweicloud.com"
# 阿里云 docker hub 镜像
export REGISTRY_MIRROR=https://registry.cn-hangzhou.aliyuncs.com
curl -sSL https://kuboard.cn/install-script/v1.19.x/install_kubelet.sh | sh -s 1.19.5
初始化 master 节点
关于初始化时用到的环境变量
APISERVER_NAME 不能是 master 的 hostname
APISERVER_NAME 必须全为小写字母、数字、小数点,不能包含减号
POD_SUBNET 所使用的网段不能与 master节点/worker节点 所在的网段重叠。该字段的取值为一个 CIDR 值,如果您对
CIDR 这个概念还不熟悉,请仍然执行 export POD_SUBNET=10.100.0.1/16 命令,不做修改
快速初始化,只在master主机上运行
# 只在 master 节点执行
# 替换 x.x.x.x 为 master 节点实际 IP(请使用内网 IP)
# export 命令只在当前 shell 会话中有效,开启新的 shell 窗口后,如果要继续安装过程,请重新执行此处的 export 命令
export MASTER_IP=192.168.170.89
# 替换 apiserver.demo 为 您想要的 dnsName
export APISERVER_NAME=monster.demo
# Kubernetes 容器组所在的网段,该网段安装完成后,由 kubernetes 创建,事先并不存在于您的物理网络中
export POD_SUBNET=10.100.0.1/16
echo "${MASTER_IP}    ${APISERVER_NAME}" >> /etc/hosts
curl -sSL https://kuboard.cn/install-script/v1.19.x/init_master.sh | sh -s 1.19.5
检查 master 初始化结果
# 只在 master 节点执行

# 执行如下命令,等待 3-10 分钟,直到所有的容器组处于 Running 状态
watch kubectl get pod -n kube-system -o wide

# 查看 master 节点初始化结果
kubectl get nodes -o wide
初始化 worker节点
获得 join命令参数
在 master 节点上执行
# 只在 master 节点执行
kubeadm token create --print-join-command
可获取kubeadm join 命令及参数,如下所示
# kubeadm token create 命令的输出
kubeadm join apiserver.demo:6443 --token mpfjma.4vjjg8flqihor4vt     --discovery-token-ca-cert-hash sha256:6f7a8e40a810323672de5eee6f4d19aa2dbdb38411845a1bf5dd63485c43d303
有效时间
该 token 的有效时间为 2 个小时,2小时内,您可以使用此 token 初始化任意数量的 worker 节点。
初始化worker
针对所有的 worker 节点执行,我这就一台slave的worker节点主机,所以直接在slave主机上执行下面命令
注意:下面IP是master的IP,最下面的token是从master主机生成复制过来的
# 只在 worker 节点执行
# 替换 x.x.x.x 为 master 节点的内网 IP
export MASTER_IP=192.168.170.89
# 替换 apiserver.demo 为初始化 master 节点时所使用的 APISERVER_NAME
export APISERVER_NAME=monster.demo
echo "${MASTER_IP}    ${APISERVER_NAME}" >> /etc/hosts

# 替换为 master 节点上 kubeadm token create 命令的输出
kubeadm join monster.demo:6443 --token 85zc9v.9aw22b9umw591rhj     --discovery-token-ca-cert-hash sha256:1d3cb8b50bdb0880493318cb4e4cb757b6d5266a63e3a790c068e3bc4d91ab5e
检查初始化结果
在 master 节点上执行
# 只在 master 节点执行
kubectl get nodes -o wide
输出结果如下所示:status为ready就ok了
安装kubernetes图形化管理工具
在线安装,用华为云的链接快一点,在master主机执行
# kubectl apply -f https://addons.kuboard.cn/kuboard/kuboard-v3.yaml
# 您也可以使用下面的指令,唯一的区别是,该指令使用华为云的镜像仓库替代 docker hub 分发 Kuboard 所需要的镜像
kubectl apply -f https://addons.kuboard.cn/kuboard/kuboard-v3-swr.yaml
等待 Kuboard v3 就绪
执行指令 watch kubectl get pods -n kuboard,等待 kuboard 名称空间中所有的 Pod 就绪,如下所示
访问 Kuboard
在浏览器中打开链接 http://your-node-ip-address:30080
输入初始用户名和密码,并登录
用户名: admin
密码: Kuboard123